The next battle or campaign we will be taking a look at is Operation Market Garden. We will be using the boardgame Holland ’44 for this, generally considered to be one of the best games on the topic.
This is a big one!
This game simulates and takes into account variables such as: weather, terrain, traffic, troop quality, blowing/not blowing bridges, and artillery and air support. It’s a moderately complex but not overly difficult game that I think does a good job of simulating the entire operation. There are many options for the players, and I am very curious to see how closely this game plays to history.
A bridge too far
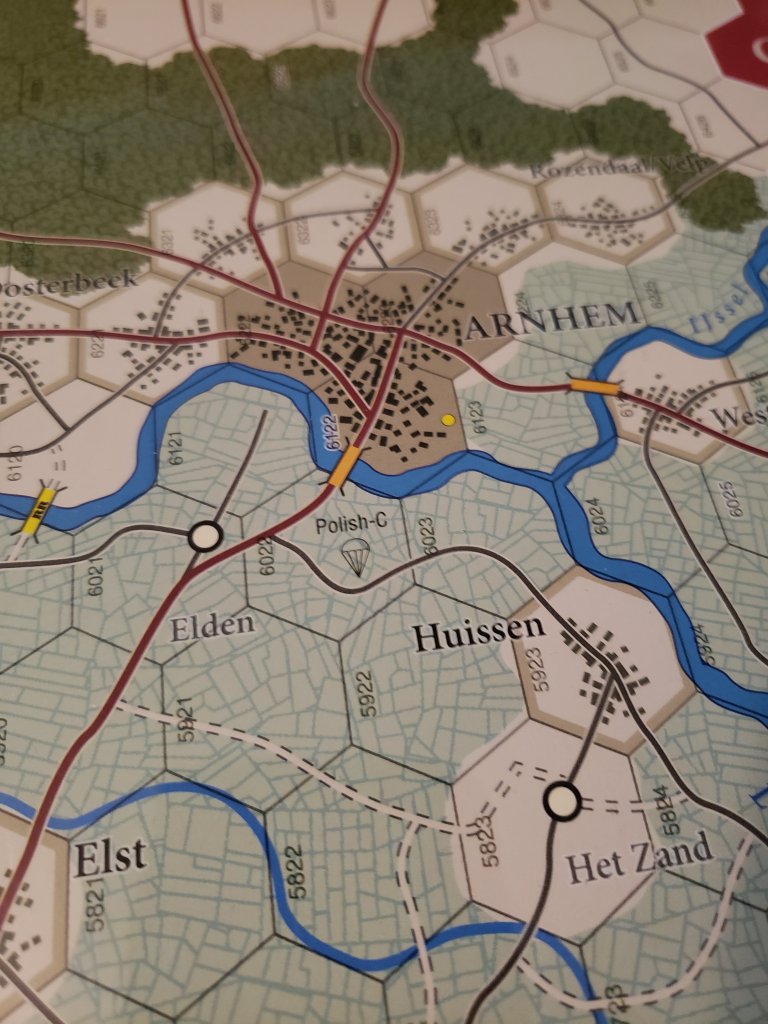
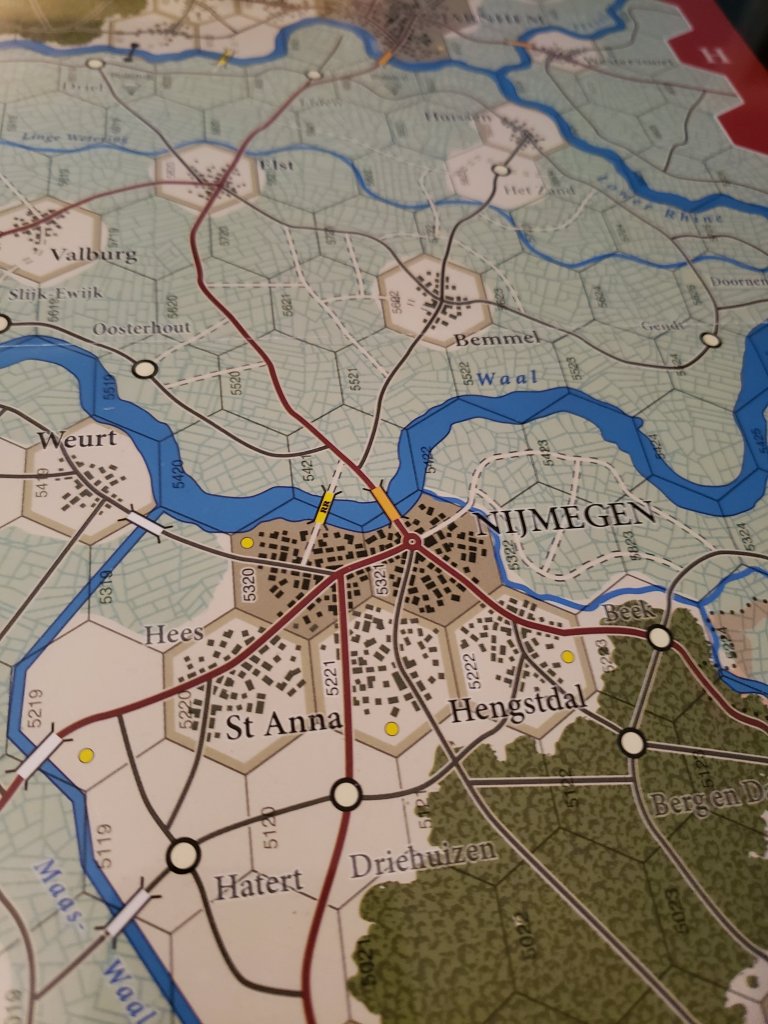
For those unfamiliar, the plan is for the Allies to drop paratroopers securing all of the bridges from the areas around Nijmegen, Eindhoven, and Arnhem. British armor will drive and attack down the road linking each of the bridges together, hoping to reach the final bridge at Arnhem and get across the Rhine River. We will get into more detail in our next post, which will cover the air drop itself on the opening turn of the game.
By 7:40, a point has been reached in which I feel that the outcome of the scenario is decided. If following the in-game standards, it seems the CSA is on track for a Minor or Tactical victory. That is very different from accomplishing the actual goal of the attack however, which was to achieve a decisive breakthrough.
7:40 in Adam’s County
Due to reoccurring command confusion, the Union was not able to launch a true counterattack against Devil’s Den. By not actively contesting Little Round Top, Longstreet essentially saves 1 extra brigade to be pushed into the fighting elsewhere. However, at the very least 1 brigade must be left behind at Devil’s Den to anchor the Confederate flank. In the event of a Union counterattack, a 2nd brigade would likely be needed in order to ensure a successful defense in that area.
Law and Wofford hold the flank
If this second brigade is required, the Confederates are in the awkward position of having not actually saved any troops at all through this effort. In our game, 3 regiments (about half) of a brigade from McLaws’ Division had to be sent to assist Law at Devil’s Den. This means that Longstreet’s net positive for troops saved for action elsewhere was somewhere in the realm of only half a brigade. The biggest ‘pro’ to this was having the entire Texas brigade, fully intact, for action near the Stony Hill.
Robertson continues to push, maintaining cohesion
The conclusion I’ve come to is this: By not actively contesting Little Round Top, or making a very real effort to take it, the Confederates leave themselves open to a counterattack by any Union troops that arrive to occupy that position. And, contrary to what would appear to be common sense, ignoring Little Round Top will not free up a significant number of troops for employment elsewhere. Of course, your mileage may vary. Whenever discussing historical ‘what-if’s’ it is almost impossible to say anything is for certain. But, it doesn’t make it any less fun to try!
This is a continuation of a play through of “Longstreet Attacks” in which the CSA will ignore the Round Tops and focus on driving towards Cemetery Hill to see how this might impact the assault.
Barksdale takes advantage of the ‘Rebel Yell’ chit and continues to push his advance with his strongest remaining regiment. Union units remaining in the area are very beat up, and he pushes what is left of Graham aside.
Barksdale presses on
The Peach Orchard has been cleared for the time being, but a second Union line has formed beyond along with artillery. It will be tough going to push on for the CSA, but with Semmes and Kershaw still relatively fresh, it ought to be possible.
CSA progress at the Peach Orchard
In the heat of combat, the Union division commander Humphreys falls wounded. This will hamper his division’s ability to maneuver and to be used in an offensive manner.
Humphreys goes down
Longstreet activates representing his personal interference, pushing Wilcox to assault the positions in his brigade’s front, though they fail to achieve a decisive breakthrough as of yet.
Forward!
“Everyone deplores that Longstreet will expose himself in such a reckless manner. Today he led a regiment in a charge against a battery, hat in hand, and in front of everybody.” -Arthur Fremantle
Benning’s brigade was beaten up badly in its initial assault. Now provided with some space, he pauses to reform what regiments he can in the rear.
Benning rallies
McCandless’ Brigade arrives as some of the last Union reinforcements to this part of the field. The Union line near the Peach Orchard has been broken, but strong fresh units make up a second line that is forming behind it.
At the double quick!
Anderson’s division has been beaten back from its first attempt to take the Union artillery position at the Codori house with significant losses, especially in Posey’s brigade.
Devastating artillery fire pushes Posey back
Near Devil’s Den, Law has been able to rally his brigade, and now together with Wofford and Robertson he is prepared to defend his gains. Union command confusion has prevented an all out attempt to retake Devil’s Den, but it is certainly on the way.
This post will cover a CSA attack on the 2nd day of Gettsyburg which will attempt (as much as possible) to completely ignore Little Round Top. It is important to note that the original attack as planned by Lee & Longstreet was to roll up along the Emmitsburg Road. Little Round Top was not known to be occupied in force by the Union army, and in fact was not when the attack first commenced. However, it IS shielded in front by Ward’s brigade and accompanying artillery in the Devil’s Den area. I think it is safe to say (unless my reading of Pfanz proves me otherwise when I get to that part of the book) that despite being attacked historically by elements of Law and Robertson’s brigades, Little Round Top was not an objective. It did however draw away valuable CSA regiments that may have been better served if directed towards the Wheatfield and Peach Orchard.
The game I am using for this, Longstreet Attacks, has rules that simulate Command Confusion and it contains the possibility of Leader casualties. But, it is important to note that Hood will start the game fully healthy, though all leaders have a chance of falling as the battle progresses. A Fog of War exists due to it’s chit pull mechanism, meaning that neither player knows which Division or Brigade will be activated next on a given turn.
All Division and Corps commanders for the Union and Confederate player will be placed into a draw cup, along with some event chits. When a leader is pulled from the draw cup, the player rolls against the leader’s Command Rating to try to give orders to a Brigade underneath that general’s command. Better commanders will activate more consistently than poor ones, meaning they will be better able to control their commands. While poor commanders will often be stuck with their wheels spinning lacking the initiative to act.
The attack begins with an exchange of artillery fire. Confederate batteries perform very effectively here in comparison to my past experiences, and are able to disorganize and drive off 2 Union batteries near the Peach Orchard and a unit of Ward’s Sharpshooters.
The Peach Orchard
“…At close range there was less inequality in our guns, and especially in our ammunition, and I thought that if ever I could overwhelm and crush them I would do it now.“ -Porter Alexander
In this game, skirmishers slow brigades approaching them by forcing them to move under “Attack” orders as opposed to “Maneuvre”, giving them fewer movement points to work with. However, because the skirmishers in front of Law were dispersed by artillery fire, Law’s brigade is able to advance forward at full speed. Robertson advances forward alongside to form the front line of Hood’s advance.
Hood Advances
As we fast forward just a bit, Anderson’ Brigade leads the push against the Peach Orchard, with his regiments stacked up in depth. Though exposed, Benning’s Brigade is approaching quickly from behind to support. Further south, Law’s Brigade has already begun assaulting Devil’s Den, driving back Smith’s battery and the accompanying infantry while maintaining good order.
Law and Anderson push
At the Peach Orchard, Anderson is driven back with losses felt on both sides. Benning has now arrived to add his weight to the attack. In the South, Law is squarely tied up dealing with Ward’s brigade which has been able to change front to meet the attack. Union response so far has been slow.
Reinforcements moving from the right
Law succeeds in pushing back Ward, but 2 of his regiments are wrecked. With Union reinforcements approaching, he will have to hold his position. Benning and Robertson’s Brigades are pressuring DeTrobriand on the Stony Hill. At the Peach Orchard, Barksdale has just begun his attack, relieving Anderson’s now wrecked Brigade.
“I rode to McLaws, found him ready for his opportunity, and Barksdale chafing in his wait for the order to seize the battery in his front.” -Longstreet
DeTrobriand holds on
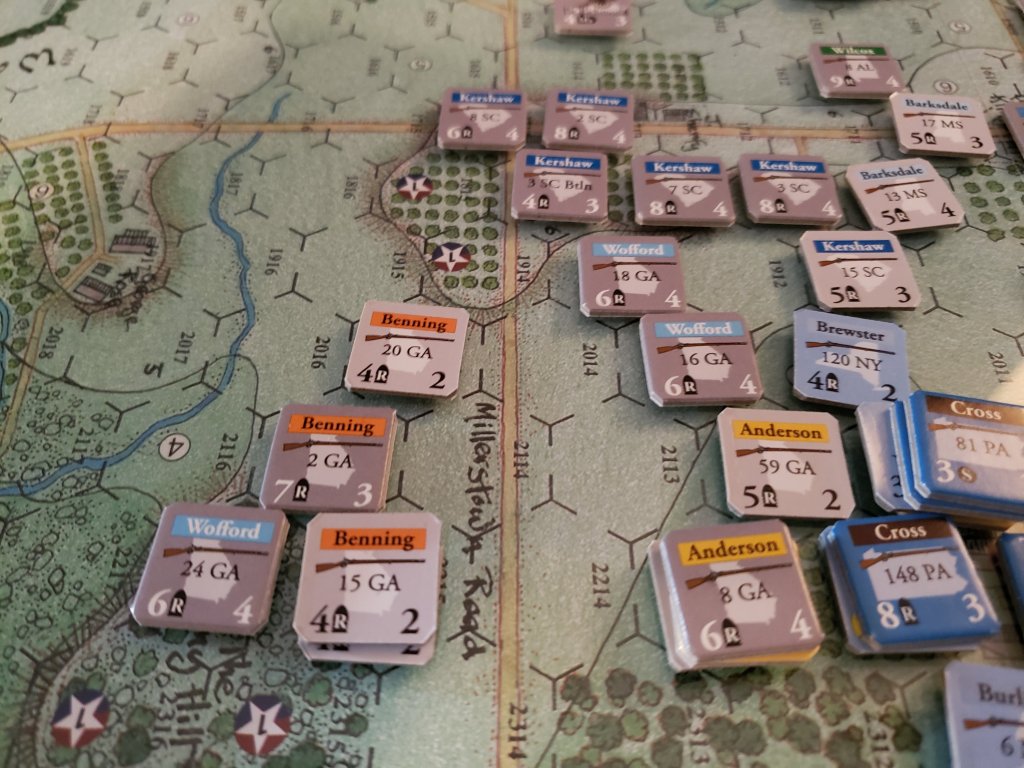
DeTrobriand puts up a good fight, but is driven back from the Stony Hill. Benning has suffered the most losses, since his brigade was responsible for the actual ‘assault’. Robertson’s Texas brigade is still at full strength and well organized.
CSA clears the Stony Hill
South at Devil’s Den, Law has begun to feel some serious pressure. Sweitzer is counter-attacking his direct front, and Vincent’s brigade has begun to attack and seriously threaten Devil’s Den. 3 of Wofford’s smaller regiments, (one of them sharpshooters) were redirected some time ago, and they are just now arriving along side of Law ready to provide support.
Counter-Attack
As 6:00 p.m. rolls around, Anderson’s Division has begun its advance. These are the final troops that the CSA will commit. Facing them is a very strong line of Union artillery that has pushed up to the Codori house, along with supporting infantry.
Union Artillery with clear lines of fire
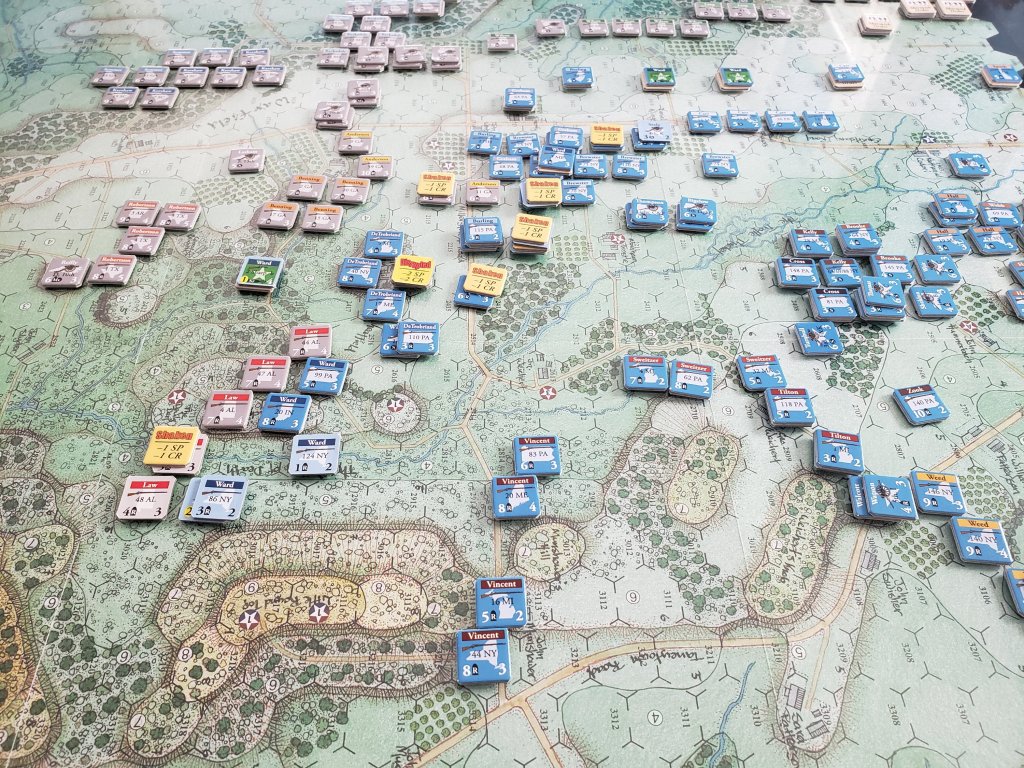
Here is a final look at the current game state after 2 hours, having started at 4:00 p.m. it is now 6:00. A Union counter-attack is underway at Devil’s Den. At the Stony Hill, Union forces have been cleared away, and Robertson is ready to push on. The Peach Orchard has been taken, and the CSA still has Kershaw and Semmes in support who are fresh. The depth and sheer number of Union reinforcements in the area means that there is still much work to be done. Anderson’s brigades approach the Union artillery line along the Emmitsburg Road and prepare for what will likely be a very costly attack.
One of the things that has been impressed upon me the most playing this game, is how difficult and costly it can be to attack directly into artillery firing cannister. As the attacker, it is much more difficult to make the weight of your own artillery felt. When the assault really begins to get heavy, it seems that your own men are always getting in the way and blocking the lines of sight that your batteries need.
Another interesting aspect to this fight is this: How much attention (if any) should the CSA pay to Little Round Top? To break off 1 or 2 brigades from the attack and direct them towards the hill greatly decreases weight from what should be the main attack. Further, the taking of Little Round Top is by no means guaranteed. I’ve yet to see a game where the CSA succesfully takes and holds the hill. Typically it is a time consuming and costly attack.
Here, you can see Law’s situation mid-way through his attack against the hill.
Law’s Brigade attacks Little Round Top
A couple of his regiments are already depleted, having made no serious gains.
As the game progresses, Kershaw begins the attack on the Peach Orchard itself. However at this time, you can see Law is still stuck at Little Round Top, despite having driven back a portion of Vincent’s Brigade, Burbank has arrived in time to support Vincent.
Kershaw goes in
The next time I play this scenario, I would like to completely avoid Little Round Top and see how the attack plays out.